Dusty44
-
Posts
133 -
Joined
-
Last visited
Everything posted by Dusty44
-
Really cool ! ! !
-
The electric sharpener I bought a year or two ago that gives me mixed results is a Chef's Choice. I bought another one about this past February as a late Christmas present for my son and it seems to be just different enough to be different. It may work better than mine. I have a "1520 Angle Select." I think I bought mine because it was less expensive than most of the other possibilities while still having the 15 degree and 20 degree options. The one I bought for my son cost about what the one in your link costs. I may need buy one of the better versions for myself before all this is over. My sharpener is designed to sharpen either Japanese 15 degree edges or 20 degree American/European edges. Pick one? Or, it says, put all your general-purpose knives through the 15 degree part and get the thinner edge. All edges are supposed to be honed/polished in that part of the sharpener after any grinding. I am impressed about your compound edges. I am converting most of my knives to the 15 degree Japanese edge. I like to cook with a Chinese Chef's Knife and the ones I bought online direct from a couple of Asian manufacturers have the finer edge already. I love the quality steel of a really decent knife and these big 'paring knives' get used almost every day. And the edges are kept touched up on one of the sharpeners. As often as not just honing a little is more than enough. It is possible to sharpen at least some serrated knives. One side of the blade is wavy which creates the toothed edge. The other side of the blade is flat. The sharpener can be used to lightly grind only the flat side and turn the toothed edge (of a relatively dull knife) into an amazingly effective cutting tool. It's in the instructions that came with my sharpener. The sharpened serrated paring knives are something to be very careful about when using. :-) I bought a Patch Knife for my little Pocket Pistol. I had a Patch Knife for it but the one I had was rather large for the Pistol. The newest one turned out to be about as big as one of my fingers. Just right. The "edge" was about as sharp as the back. I used the belt sander with the leather buffer belt and 2000 grit homemade belt to put a sufficient edge on it to cut cotton cloth. Nevermind that in actual loading for shooting I use pre-cut patches. LOL.
-
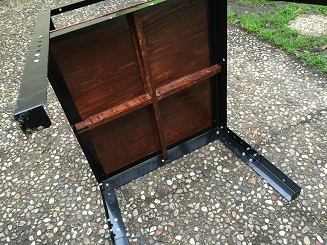
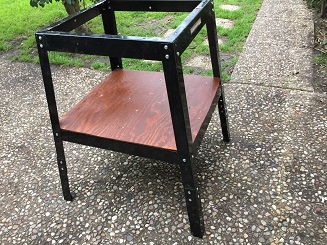
Knife Sharpener: July 4, 2015 Sharp knives are great. I got tired of the time needed to really sharpen all my kitchen knives and keep them sharp with very fine grit materials like 750 Emery Cloth and 2000 grit Crocus Cloth. I bought an expensive electric sharpener that does reasonably well. It grinds and hones edges to Japanese and to American/European standards adequately well; usually. Some of the knives in my kitchen drawers don’t sharpen with the electric sharpener. Dunno. Like three paring knives all bought at the same time; same manufacturer; identical design. Two get great edges in the electric sharpener and the third is a lost cause? I was reading and watching You-Tube videos and decided to try the Harbor Freight One Inch Belt Sander. I bought the next-fancier sander with the 5 inch disk sander included. The One Inch Belt part appears to be the same. Harbor Freight sells two ‘Tool Stands.’ I bought the larger one. The top frame of mine is almost square. The other one is the same length but narrower. What Harbor Freight sells is the parts for the frame. A power tool can be bolted to the frame or mounted on a self-made top. Pictures below of my Top and Shelf. I used scrap 2x8 boards and some ¼ inch plywood discarded from a neighbor’s house renovation. [Anything put out for the trash pickup is fair game. This has been all the way through the Supreme Court.] The only power tools I had before the new Sander and Tool Stand was complete were a circular saw (from Harbor Freight, bought long ago) and a 3/8†Craftsman drill. I cut the 2x8 parts to length with the saw; made two cross braces from 1x6; used [sheet metal] screws [with tight drilled clearance holes for the shaft cores] to tie the cross braces to the heavier parts and glued it all with Gorilla Glue as I went along. That way I got a finished product as flat and straight as I could manage that was also solid when done. The 1x6’s were measured to just fit inside the top frame and then allowed some clearance. When I assembled the final thing it was all a press fit. Fantastic. The Tool Stand has a secondary frame halfway down. A wood table can be put on it but must be placed before the framing is completely bolted together. There is no way to fit a full-size shelf into place if it is all bolted together. I cut my shelf to size and cut the small amount of extra wood into four strips 3 inches wide to use for a fence around the shelf. So things put there would not slide off the edges and be lost on the garage floor. This shelf is not actually attached. It sits on top of the framing. The 1x2 [i make lots of stuff from 1x2 but the stock pieces for this project also came from that trash pile] support parts were notched to fit around and under the steel frame members so the shelf is trapped in place. I notched the 1x2’s to fit together and used screws and Gorilla Glue to attach them to the bottom of the shelf. I stained and varnished the shelf and fence parts with left-overs from other projects described in other posts here. When the Tool Stand was completely together I added the fence. I glued the parts to the shelf for about 6 inches in the middles; taped inside the steel vertical frame parts to isolate them from glue and glued the fence parts together at the corners. It is all quite solid. I used Formby Tung Oil [a little orange-color bottle] to coat the top on all surfaces. I think the Formby’s is an acrylic. It soaked in very quickly and the surface is very good. I can recommend this treatment. Final step was to tie the Top to the Tool Stand with Carriage Bolts. I used an adapter [short shaft; hex on one end and ¼ square drive on the other] in the drill motor with standard deep sockets to pull the [self-locking] nuts down tight. Flat washers underneath the Top worked well. The Carriage Bolt tops pulled well into the surface of the wood which is good. It keeps them from rubbing or getting in the way of work or of tools mounted on the table. I made belts from 2000 grit sandpaper sheets as described in the You-Tube videos. One belt works and one will not stay taped together. I bought a leather buffing belt and have mixed results but it does work; some. The instructions said to put the supplied compound on the rough side before putting the belt on the machine and use it that way for a while. I ran the belt this way before putting the compound on it and it ran properly. After adding compound the belt will not stay on the machine. I turned the belt smooth side out and added compound while the machine was running and it works that way. Building a “Knife Sharpener†like this is clearly serious overkill. The Tool stand with a heavy top and a shelf or storage drawers unit would make a great Reloading Bench too. One that could be made and used even in an apartment. In an apartment it might be best to not try to stain or varnish or use the Tung Oil stuff unless there was a place outdoors that could be pressed into service for a few hours and where spills and mess would be tolerated. I paint in my backyard on the firewood or on a couple of big cardboard boxes that have not yet been discarded. A Top could also be made from just 2x4 stock. Cross pieces also from 2x4. It would be best to clamp everything together with glue in place and then drill and screw the cross members into position. Harbor Freight sells clamp parts that fit onto black iron pipe so a clamp or clamps of any needed size can be managed. I did not use a clamp and my 2x8’s moved a tiny bit apart in spite of my efforts to not let that happen. The Gorilla Glue foams a little and took up the slack, however. I used a chisel to remove the raised lumps of glue before they got too hard. Now that I do have this new power tool and the vise I bought decades ago has a home I have been able to do more projects that would have not been possible not very long ago. Even slightly re-sanded and reshaped the handle on my little front-stuffer Pocket Pistol [see other post in this forum] to a better fit.

-
RIP MicroGunner. You will be missed.
-
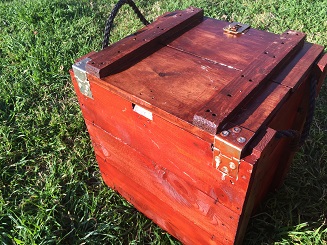
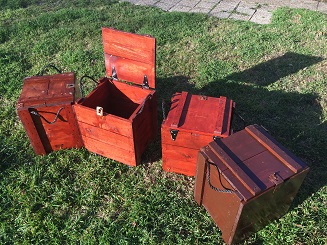
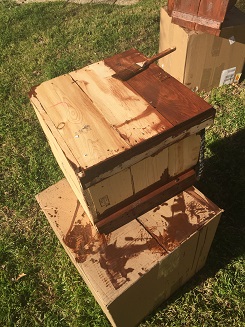
One more picture. Here are my new ammo boxes stacked where I am filling them with stuff that has been blocking a closet. On top of the stack is one of the Russian 7.62x54R ammo boxes from the last time. The wood of the Russian boxes soaked up stain and varnish like a sponge. The wood of the new ammo boxes soaked up a lot but not nearly as much. The Minwax 'stain with sealer' kept the absorption of Spar Varnish reasonable. It is interesting that the Russian boxes use a minimum of metal. The ribs on top and bottom slide into tongue & groove dovetail slots. The side-walls are fitted together with tapered dovetails. Nails are used to hold the handles in place and to attach the bottoms. The American-made (Ohio; pine) ammo boxes are assembled with a whole bunch of nails. The wood of the Russian boxes was rough and I sanded a lot between coats of varnish. The face wood of the American boxes is smooth and I blew off sanding. I can tolerate the rough cut ends of the boards. The American-made boxes only got one heavy coat of varnish which seems sufficient. As always I resized the pic (with Paint.net; free for individuals for non-commercial use) from an original cell-phone-camera size of 1.2 Meg down to 117 Kb for this post.
-
I bought the boxes online mail order from The Sportsman's Guide . com; military surplus section. The dimensions in the catalog are interior dimensions. My outside measurements are ~17 1/2 inches wide; almost 15 inches front to back; ~19 inches tall or ~22 inches with the wheels I added. I estimate real cost at ~$25 each, delivered, ground. I think the current catalog price is ~$17. Sportsman's Guide has a lot of specials and closeouts including wood military surplus ammo boxes. It is worth opening a (free) subscription to their advertising to keep track of the specials. If you see something you might want offered as closeout or special or something like the wood ammo boxes, buy quickly. They never last long. Regular catalog items will be there for a while. FWIW: I have no interest in this company; I have occasionally bought things from them for a long time. If you varnish your ammo boxes, I used most of two quart cans of stain and a lot of a gallon of Spar Varnish (from Lowe's) for 5 boxes. A week later they are still sitting outdoors under a wide roof overhang outgassing fumes (but just a little now) as the varnish cures. I also bought two pairs of Lowe's chemical handling gloves for painting and am glad I did.
-
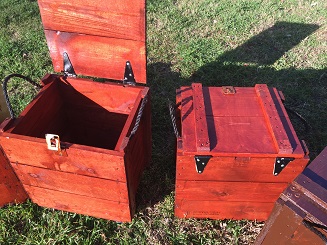
A couple more pictures. These are the Mil Spec hinges with the reused OEM square-drive screws and the way I installed the strap hinges. The color difference of the lid on one box with Rustoleum "American Walnut" stain thinned by half with Mineral Spirits and the consequent unevenness of that color as well as the difference in the color of the Minwax stain. In the first post the colors of the boxes in the picture of the group of boxes are: full "American Walnut" on the right; the others are "Gunstock." If looked at closely, the dark box on the right and the middle lighter color box seem to sit on top of the grass while the remaining two sit down in the grass. That is because of the rollers under the first two. The lid on the box on the left is half-thinned "American Walnut." Each box was coated with a stain or stain & sealer, allowed to dry for an hour or two or overnight, and then given a heavy coat of Helmsman "Satin" Spar Varnish for all-weather all-conditions use. I started with Rustoleum "American Walnut" stain; think it is too dark. Tried thinning it against Rustoleum's advisory. They are right. It will thin but it has bad effects on the final result if much thinner is added. I switched to Minwax "Gunstock" stain & sealer. Lighter color is better. The cardboard boxes the wood boxes came in did service as paint stands. A couple of tin cans rescued from the kitchen trash served for holding the Mineral Spirits for cleaning the brush and for mixing paint. Working in the backyard was nice because paint spills were of no consequence. Sometimes in the three different days when I could work outside I had good sunlight and sometimes I was mostly in the dark in twilight. The stain shows the consequences of lighting, bad wood with squirrely grain of twists and knots, hurried work or darkness. I used a few pieces of firewood to set the boxes on to keep them out of the grass while paint dried/cured. The box with the Mil Spec hinges has the last lid. Minwax stain on the box; the last lid popped up from being shunted aside along the way after the Minwax stain was used up and it was getting quite dark. Mixed some "American Walnut" by half with Mineral Spirits and did the staining. The color diff is one way to identify different boxes. ;D I carefully cleaned the glue ooze for a couple of hours on the hinges and then went to bed. In the morning the additional ooze from overnight was too stiff to mess with.
-
Somewhere in this forum I have a post about a rifle and in the middle of that post is a discussion about putting a finish on some Russian wood ammo boxes. I have done it again. Here are some discussion posts about more "finishing" of wood ammo boxes. To keep pictures close to text I will do several postings. I bought some wood ammo cases from Sportsman's Guide (.com). These are sold as 'new; never issued.' I personally suspect the GSA never accepted/bought them; rejected them. There is space between some of the boards of 1/16 to 1/8 inch or possibly more. Lids do not fit quite exactly right on some. Otherwise, they are built to Mil Spec and are very strong. For some purposes the slight ventilation can be good to help keep contents dry or allow volatile gasses to escape. Each box has a Mil Spec latch and one hinge. I kept the latches in place; they are adequate for my needs. One hinge does not do well; two are necessary. I took the hinges off and then cut notches to put two on each of two boxes by notching the box with a small saw and a wood chisel in the same manner as the OEM installation. I put the hinges at the outer ends of the lid rather than inboard of the top ribs. I just did. It works very well. The OEM screws have a square drive. I was lucky to have picked up a little set of power drive bits recently that had several sizes of square drive tips along with an assortment of other kinds of driver tips. Just a little pack of a handful of the drive bits, brand name is Pittsburg which would indicate I bought them at Harbor Freight; although I seem to have a memory of picking them off a rack while wandering through the hardware aisle at Target? On a whim. I reused the OEM screws for these original offset hinges. For the other boxes I used 4 inch strap hinges from Harbor Freight. The price at Harbor Freight was half the price at the Big Box stores. I used #8 sheet metal screws to attach the strap hinges. A clearance hole is needed for the screw shaft cores but the constant diameter sheet metal screw is much stronger. I used a drill bit that was barely too small. I put my strap hinges on the backs of the boxes and under the lids at the ribs on on the lids. I didn't bother to notch the boxes for the strap hinges. The 1/16 lift is not noticeable and with the other problems in the construction of these boxes it is irrelevant. I put a little Gorilla Glue on the boxes and lids under all the hinges to help hold the hinges in place as an experiment and to lock the screws in place. A small amount of glue applied with a Q-Tip and a drop of water (catalyst); oozed and squeezed out for too long. I wiped and cleaned it for an hour and went to bed and in the morning there was much more white glue ooze that was already too stiff to deal with. Whatever. One screw-head on each strap hinge hits the edge of the top of its box. I did some quick inletting to create clearance using a box knife and then colored the notch and varnished it with a Q-tip for a brush. I also bought rollers and swivel castors rated at 75 pounds each at Harbor Freight; much cheaper than anywhere else. Total load capability of 300 pounds should be much more than I will ever need. I wiped and lubed my rollers and castors with my gun oil (Mobil One Full Synthetic with 5% Kroil) to make them permanently moisture/corrosion proof. I put wheels under three boxes and left the other two be. I intend to double-stack those on the ones with rollers. Click on the pictures to make them bigger.
-
January 10, 2015; 10 AM: This morning I found an ad for Sportsman's Guide offering wood ammo boxes. Said limited quantities. I ordered 5. These are apparently American made, never issued. Approximate interior dimensions 13" x 14" x17" tall. About $20 each. Several years back I bought some Russian ammo boxes from Sportsman's Guide that were/are great. There is a post in this forum somewhere with pics of the Russian 7.62x54R ammo boxes as I varnished them with Walnut stain and Spar Varnish inside and out. One of my Russian ammo boxes was badly damaged; not apparent until the lid was opened and half the box fell apart. I used Gorilla Glue according to directions (wet one wood surface, put a small amount [thin bead] of glue on the other surface; clamp together for several days. I weighted the box down with the rest of the boxes to hold everything as tight together as possible. The fix worked perfectly and with the stain and varnish and a long time since I am not sure I can tell which box it was. That old wood soaked up a lot of stain and a lot of first-coat Spar Varnish, very little second-coat varnish. The boxes are quite pretty for what little effort I put into the finishing. I kept the original markings/stencils visible through the varnish and minimally sanded the first coat. Those old boxes are now full of my ammo and shooting supplies. Perfect for that use. Notes on these new ammo boxes I ordered from comments/reviews: There is only one hinge. Best to remove it and replace with two hinges if you are going to be opening & closing very often. Latch will not secure lid very well. Replace that, too.
-
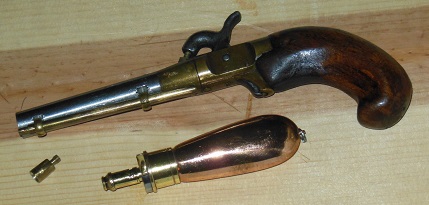
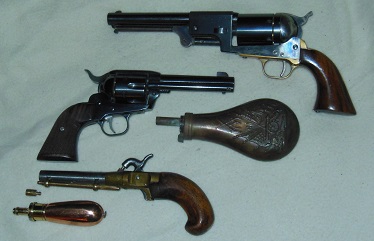
Last week I was wandering through some black powder stuff online. I found a 'closeout' for a "Pocket Powder Flask" from "Track of the Wolf." Then I looked through the offered sizes of black powder Round Balls just out of curiosity. And at something else I have not been able to find-- a card wad to fit a 45 Long Colt case. I found Round Balls, Hornady no less--- in .433. I have a Derringer, a kit I bought by mail order back in the 1970's because it was cheap. I think it was called a "New Orleans Derringer;" is nominally a .44 caliber that takes .430 patched balls and ~20 grains of powder. I have not had round balls in this size in decades nor been able to find any. The .433 is fine. I only bought one box, a hundred, and may regret not having bought more someday. But for now it's all OK. For black powder cartridges, Track of the Wolf offers sizes and thicknesses of wads to fit a variety of cases for a variety of purposes. I bought one package, a thousand in .455 diameter and .025 thick, to try. I had to know how the little flask would do as an accessory for the Derringer. So I submitted my order. Three or four days and it was all in my mailbox. The card wads fit inside the 45 Colt case tightly and perfectly. They are to keep melted crisco & beeswax homemade lube out of the powder when loaded ammo is sitting around. I now have a new supply of balls for the Derringer and the little Powder Flask is perfect. It is adjustable in Drams of powder. The big setting is 5/16 Dram; if the numbers I found were right, two throws from the spout will give ~17.6 grains of Black Powder or equivalent in Pyrodex (Pistol). Perfect! The pictures attached are comparisons. The Derringer: there were minimal and mostly no instructions with the kit. In ~1975 +/- I had no tools and did what I could. It shoots fine. Maybe someday I will try to do more for the shape of the wood. No promises. The original ramrod got lost while out shooting the gun on private land at a private range. I used a broken end of a rifle ramrod for years that was a piece only a foot or so long. A year or two ago I bought a length of brass rod in a hardware store that happens to be close enough to the diameter of the original ramrod. A file and a few minutes created a new ramrod shaft. The tip is a (Hornady ??) ramrod tip for loading long pointed sabot bullets into BP rifles (bought at Cabela's). I filed the outside to suit and now need drill out a hole in its base for the new ramrod shaft. That will take away the threaded stem, too. Then tin the inside of the hole and the sized tip of the shaft and put them together hot with a drop of additional Silver Solder. The Silver Solder is a kit: a foot or so of solder and a tiny bottle of flux; sold in some hardware stores and some model airplane shops. A propane torch for heat. Needs a comfortable day to work outside and some time so as not to feel rushed. The (Colt) Replica 3rd Model Dragoon: is a cap & ball revolver, do not remember the official vintage year but near 1851 (?) and this one is modified (common after the American Civil War) to accept 45 Colt cartridges. This revolver can use both the original Cap & Ball cylinder with .452 balls or the modified cylinder with 45 Colt (or, Long Colt) black powder cartridges. I have a small supply of GOEX Black Dawge 45 LC cartridges that are factory loaded with black powder. Note that an individual under applicable law can modify these originally cap & ball revolvers to accept and fire a cylinder that uses cartridges. Usually it is necessary to fire black powder or published light loadings of a few specific smokeless powders and soft lead lighter-weight bullets than the classic loadings; all to specs appropriate to the standards of the Cowboy Action Shooter's requirements. Heavier loads and bullets or bullets too large in diameter or too solid (like copper clad or tin-lead alloy bullets) for the gun can cause extreme grief. As in guns that explode in the hand when fired. If these modified revolvers are ever sold they are subject to the requirements of selling/transfer of any other cartridge gun and not to the simpler requirements for a front-stuffer; whether or not the cartridge cylinder is included in the sale/transfer. In the attached pic the tell-tale gleam of cartridges in the cylinders is obvious. Five new empty shell casings for effect, loaded with an empty chamber aligned with the barrel. The Ruger New Vaquero: is dimensionally within a few thousandths of an inch identical to the 1873 Colt "Peacemaker" six-gun. It is there for size comparison, only. It is .357 Magnum. The gleam of brass in the chambers shows the 5 new empty casings loaded for effect and the chamber aligned with the barrel is empty. The big powder flask is standard size and pattern for the Civil War Era. The spout throws 40 grains of Black Powder which is correct for the Dragoon Cap & Ball cylinder. The 40 grains gave a very satisfying blast, recoil, made the ram latch come loose and drop the ram handle jamming the gun, and fragmented the cap on the nipple spraying tiny fragments into the mechanism around the hammer solidly jamming the gun. Real world it was a single shot firearm. It took a half-hour to load and an hour and a half to shoot 6 rounds while cleaning the fragments of cap copper out of the mechanism so the next round could be fired. And the movements of the gun to do all that made a private range and solitary shooting essential. It is possible that 'back when' there was a common use of a grease around the cap to keep those fragments from spraying everywhere or the copper was thick enough to tolerate the blast. I dunno. I have seen a very few references that can only make me wonder. A "bit of leather" was commonly used to hold the ram handle in place. I had some baby girls at home and used a hair scrunchie doubled to hold it. With the new cartridge cylinder I need a place to go shoot and see how it is ??? The little Powder Flask: is just right for the Derringer. Perfect companions. The little flask is historically accurate to the 1830's and 1840's and the Derringer is a "would be, could be" for that era, too. The guns and the flasks would be appropriate armament anytime in the 1875 to 1890 era. There would be the Cap & Ball cylinder for the Dragoon and a front-stuffer rifle that is not shown and a knife or knives. A hunting knife and a small patch knife that might also be a skinning knife. Black Powder was known and trusted to as late as the 1930's, often preferred to smokeless powder with good reason. The technology from WW-1 began to change minds and after WW-2 we all prefer smokeless powder when the chips are down. But Black Powder was King Of The Hill for most of a thousand years. Click on the pics to embiggen.
-
Completely hilarious!
-
For picture editing, Paint.net is a free download for non-commercial individual use. Somewhere in this forum a long time ago I discussed it at considerable length at least once and more likely several times.
-
This link is about hunting in Kenya and the consequences when managed hunting is stopped. It is interesting that the article was presented by Bloomberg. It says in strong terms that wildlife in Kenya was doing well while managed hunting and wildlife management was being done and that since hunting has been stopped the wildlife has been almost destroyed. http://www.bloomberg.com/news/2014-08-19/lions-hunted-to-preserve-rhinos-in-south-african-circle-of-life.html
-
We will know for sure when there is bulk 500 rds+ 22 LR in Walmart for $9.95-- again.
-
I have always kept just a few rounds in a defensive mag. Less pressure on the springs. Typically 5 rounds but in bigger capacity mags up to 15 rounds. 5 rounds is still a big part of capacity for an M1911 in any of the calibers (45 ACP; 38 Super; 9 MM) but does not squeeze the spring all the way down. In my 10-22 I had mags in 20 and 30 round sizes. I had most of them for years, several after-market brands. About the time I did the modifications discussed in this forum I bought a Ruger 30-round mag. When I took the 10-22 to the range for shooting, none of the aftermarket mags worked very well. They would jam or not feed properly with an apparent correlation to how many rounds had been kept in them. I tossed them into a junk parts box and only have kept the Ruger mag in service.
-
I think mine is a GE product; either made by GE in China or made in China for GE. Extra production is sold to other qualified wholesale buyers. Mine carries an ID/Data plate that says it is a WalMart product. I had seen it advertised and then one day a year or two ago walked into one of my area Wal Marts and saw the identical item on the shelf for about $10 cheaper and grabbed one up. The same apparent design is available at Amazon. I bought another one as a gift for Christmas; a very different looking unit and brand and had it shipped direct. I do not recall what I bought. Mine is rounded and silvery colored. I Think the GE branded one is white. The gift unit I bought was black and square shaped. I looked through the specs offered in the Amazon online catalog and crossed my fingers. Nothing has been said and the unit may not ever have been used. The person I sent it to has a gas stove and I thought an electric unit might be sometimes worth having as well as being inductive. The unit gets a little warm but not so much as to burn fingers and cools almost instantly when the power is turned off and the pan removed. A fan runs briefly underneath to cool the induction coils. I keep a paper plate on it to catch spills. The paper plate gets black after a few uses from spill material caught under the frying pans and is easily replaced. Cooking is smooth and heating time is quick and heat controls very nicely. I stress olive oil as the healthiest cooking oil and keep my cast-iron coated with it. The oil on the bottom of the pans helps the paper plate get blackened. Soap never touches my pans. It took me most of my life to recognize/believe the need to not let soap touch cast-iron. :-)
-
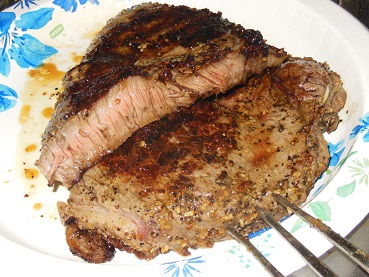
All-Weather Grilled Steak: A sirloin steak or steaks; 12 oz or more per person Olive Oil Montreal Seasoning Fresh garlic (optional) Cast-iron (grill) pan Steak can be one individual-size steak per person or split a big one for two-- after grilling. Steak needs be about an inch thick or more. Start with thawed or never-frozen steak. Coat heavily on all surfaces with Montreal Seasoning and allow to sit out lightly covered and marinate 30 minutes to an hour; steak should be at room temp by then. Put grill pan on fire (stove burner) and warm it up. Some olive oil in the pan can be a guide. The oil should just begin smoking. Turn off the heat. Let the warmth spread through the pan. A few minutes. Heat the pan again on high heat. The olive oil should be 1/8 to 3/16 inch deep in the bottom of a cast-iron frying pan. In a cast-iron grill pan (better) the olive oil should be exactly to the top of the grill strips and just barely trying to flow over them. If using garlic, put a couple of diced cloves in the pan, spread the bits around, toast them in the hot oil. Add the steak to the hot pan & oil. 3 minutes. Turn the steak over. 2 minutes and if needed, use spatula to hold the steak down flat. For (usually) quite rare, it is done. For a medium rare to medium reduce the heat to about half, turn the steak again and fry it 2 to 3 minutes; turn again and give it 2 to 3 more minutes. That is up to twice on each side. Done. A large steak (for two persons) can be cut in half now and inspected. Or cut a little sooner and inspected and cooked longer if desired. When the cooking is complete put the steak on a plate or plates and let sit, covered (wax paper or whatever) for at least 5 minutes up to 15 minutes. This is very important. Serve and enjoy. Notes: Keep turning after 2 or 3 minutes. Frying/cooking for 5 minutes in the middle step is not the same as turning over and changing the direction of heat flow. Olive Oil: if you are not familiar or do not have a favorite Olive Oil you might do better to buy a California-grown oil. Research it. I buy "California" brand olive oil because it is a US grown product and is subject to US Ag and Food standards. "California Olive Ranch" brand is the only US brand I can easily find in my area. There are other common brands of California-grown olive oils. I can tell the difference; to me it is well worth the price differential. Olive Oil from the Mediterranean is mostly a fungible product from any and all countries and growers. Read the back of the label. Higher priced Med oil may be from a single grower and this will be on that label. If it lists several possible countries, it is a generic product of unknown source and quality and multiple growers. Finally, Olive Oil is generally the healthiest oil you can use. At my house, the steak flavors are better if the marinating time is longer rather than shorter. I use an Induction Cooker unit with my cast-iron pots and pans. I prefer the Induction Unit to the stovetop. The Induction Unit has a countdown timer built in and my cooking times are reasonably precise to within a half-minute. Personal preference may like a steak sauce on the table or the flavors from the cooking process may be enough? I have tried sauteing mushrooms in the oil left in the frying pan after cooking the steak. Much or most of the excess salt from the marinade is dissolved in the oil that is left behind. The sliced mushrooms cooked in this leftover oil were intensely salty, barely edible.
-
The link below is for an article in "TheFirearmBlog.com." Still pics; videos; graphs; discussion. 15 muzzle brake and flash reducer devices are reviewed and compared. I have a (free) subscription that sends me an Email from time to time. This article seems to be worth posting a link. http://vuurwapenblog.com/2014/01/12/ar-15-muzzle-device-comparison/
-
To put more information in one place: The 458 SOCOM is supposedly the result of a back-yard Bar-B-Que & beer party during year 2000. Some attendees of this gathering were significant people in the military and in the firearms industry. The objective was a minimal new-equipment firearm to 'stop' bad guys. Like in Afghanistan. The ideas worked out well. It is supposedly said in Special Ops circles that "If you want to reach out and touch someone, use a 5.56. Use a 458 SOCOM if you would rather reach out and tear them apart." Or, in our context, stop that 250 pound charging boar in its tracks. The details are dealt with very well elsewhere. If you as the reader are interested, some basic search will find a lot to read. The result was to use a design for the brass that used the shell base common to the 308 Winchester and several other cartridges. Casing length was kept where a common bullet would fit with COAL to match the capabilities/length of a standard 5.56x45 magazine; casing max diameter to fit in that standard magazine for the M-4/M-15. The 5.56x45 is essentially a double stack in the magazine. The 458 SOCOM is a neat single stack. Therefore, the same lower receivers and magazines used for the M-15/M-16/M-4 can be and are used. The same upper receiver is a start. There is a different barrel extension and some other machining. The same bolt carrier works but a special bolt is fitted. All the parts in a standard M-15 lower are untouched and a 458 SOCOM upper will intentionally attach directly to an M-15/M-4 lower. Note: it is really best to add a recoil pad like the 'Limbsaver' to the stock. This SOCOM rifle will leave bruises otherwise, at least with some loadings. I have noted in other posts that I added a Limbsaver pad to my Rem 700 in 7 MM Rem Mag and that recoil which had been severe went almost entirely away. Limbsavers on my 308's, bolt and AR, make firing those about like shooting my Ruger 10-22. If you shoot mostly in winter with a heavy coat it may not be a big thing either way. I do much of my shooting on nice summer days when the local temp is above 100F and there is a worn T-shirt between me and the rifle. Starline makes 458 SOCOM brass which is easily obtainable from most common vendors. The bullets are standard for several nominal '45 caliber' cartridges using a .458 dia bullet. Very specifically, these .458 bullets are used in the 45-70 Government cartridges and the external ballistics of the 458 SOCOM are identical to the 45-70 Govt. Bullet weights run from a high of ~500 grains with a very subsonic muzzle velocity, well suited to Special Ops with suppressors and needing high stopping power, to very respectable relatively flat-shooting rifle velocities using 225 to 300 and 325 grain bullets. This cartridge uses large pistol primers and carries the warning that like the M-16, the thin primers are susceptible to slam-fires. Commonly available powders are used like Lil Gun, RL7, others. Look up commonly used loads described in other forums. Loaded ammo is available from all the usual vendors. It does tend to be pricey. If I started with loaded ammo I would want to have the capability and would reload my fired brass. Some of that is reducing the cost of ammo but more is the fun of making my own and trying to beat the accuracy of factory offerings. I have found a lot of copper-cased bullets and some hard-cast lead bullets but not any hard-cast gas-check bullets yet. There was a listing for a ~400 gr gas-check bullet mold. Not what I am looking for. Hard-cast heat-treated bullets are more than I am willing to try to make for myself. Want to buy a ~300 gr WFN gas-check hard-cast for feral pigs: after and if I ever buy a 458 SOCOM. Accuracy reported is excellent; maybe spectacular; out to at least two hundred yards. More to read about in those other forums. Uppers and complete rifles are made and sold by Rock River Arms and by Wilson Combat. So far. Components to build your own are also easily available.
-
Recently I had the 458 SOCOM brought to my attention. I read up on it in Wikipedia. It is interesting that the M-15 can be made to use this kind of ammunition. Look up the write-up in Wikipedia. It is lengthy and covers the subject better than I can in a post. My take is that after obtaining a 458 SOCOM upper for your existing M-15 lower, it would be best to buy brass and 'roll-your-own' ammo. I personally, if I did not already do my own loading, would buy a Lee balance scale, a set of dies, a Lee "nut-cracker" hand press, perhaps two hundred new casings and several boxes of bullets. (Experimentation needs several bullet designs and weights and powders; or take your best guess and use the powder of the Wikipedia article and see how a given 300 gr bullet does. After you have one you & your rifle like, buy 500 or 600 of that bullet and load them into the casings.) There is a bunch of small items also needed that are quite cheap as individual items but collectively add up. It still might be possible to be doing this loading for under a $hundred? Exclusive of the price of the casings, bullets, powder? The best caliber I know of for hunting feral pigs (called by many, many names-- including the ones suitable for print) so far is the 44 Magnum. A heat-treated hard-lead WFNGC ~300 gr bullet from a 44 Mag revolver (a big Ruger) or better from perhaps a 44 Mag Lever Rifle will do a fine job of stopping any pig. The 300 grain bullets/loadings put too much stress on any but the big heavy-duty Rugers. I fired 6 rounds of this stuff from my Smith and swore never again. OTOH, my Marlin 1894 Microgroove does its best with this 300 gr lead. The M-15 platform in 458 SOCOM just might be the optimum 'pig gun.' Instant availability of a lot of rounds if faced with a wounded pig in a 'situation,' ability to shoot more than one pig with only the need to move the targeting, a short quick-retargetable rifle. The 300 gr flat-nose 458 lead slug in a hard-cast lead WFNGC heat-treated version, if available, would seem to be ideal. Just need a report from someone who hunts pigs and who may have tried it. The cartridge & rifle would seem to offer minimum recoil to the point of perhaps essentially no felt recoil, ~2000 FPS, a slug that would hardly notice the pig, and real-world the pig would think it had been hit with an RPG?
-
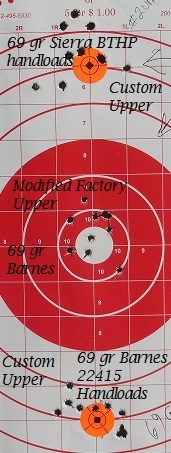
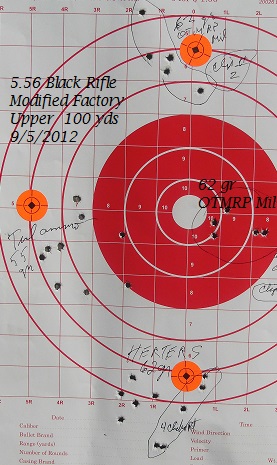
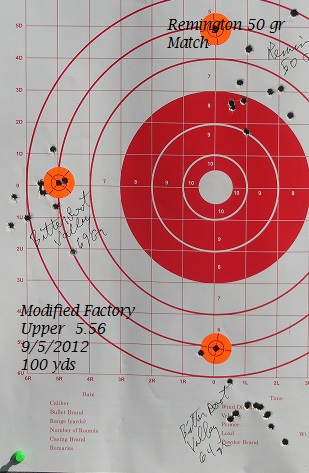
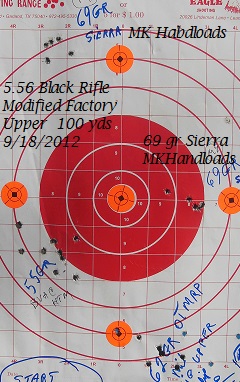
I do not know where the rest of this thread may be. Here are some promised pics of targets. These are from the last trips to the range and compare different ammo and a comparison between the modified factory upper and the upper I built. I would like to think that the Ranier barrel does better, but it is in doubt. All shooting is hand-held with the butt against my shoulder. There are sandbags and sometimes my wrist rested on them and sometimes the rifle rested on them. This would vary from one target to another. Shooting at a given target was done in the same manner. Some days the sand in the bags was too hard, sometimes it was fine. Depended on the humidity, apparently, and if the sandbags had been rained on. These are standard targets with 1 inch grid and rings. The orange disks are stick-on 1 inch diameter.
-
I came across this notice a few days ago. I was reading something in computer news and there were those additional items at the bottom-- and maybe the second or third time I wandered into new pages I saw this. The long form says that the cartridges may be double-loaded with powder and that is enough to blow up the gun-- in at least some cases. If anyone reading this has any of the described ammo it would be best to send it back. The long form had more to say. If it applies, contact Winchester for full and accurate information.
-
Twitter link: The best thing and the easiest was to Tweet the article as a way to save it where I could find it again. Here is the link. Enjoy! Dusty44 @Dusty44 1mPhotographer captures high-speed photos of guns a millisecond after they fire (29 PHOTOS) http://shar.es/9vJ1Y via @sharethis
-
I was shooting a DPMS Panther A-15 with match trigger and free-float tube. I built a second upper with a better barrel and the same FF tube and have comparison results. My impression is that the higher-priced match barrel may have generated smaller groups but it would take a lot of shooting and precision measuring to be sure. There may be pictures of the rifle and some targets in this forum. If not, then in our sister forum, 308AR.com. All pics and shooting were in the warmer months of 2012. My calculations are done with a TI ~$10 (at time of purchase) scientific calculator. This calculator will give you a complete statistical breakdown if you want to do that. The loads I use in my reloads are an average of 4 or 5 reloading books published loads. I find the average maximum and average minimum loads for each powder & bullet I use and add ~65% of the difference to the average minimum load. This will usually compare well to the published 'best accuracy' loads and is a little conservative for safety. I am not happy with any results I got with the .223 AR(s). I got much better results with my DPMS AR-10 and with my Remington 700's in 308 and 7MM Rem Mag. I normally fired 10 to 25 rounds of any given .223 load in 10-round clips on a trip to the range and 2 to 5 different loads. Most of my shooting was with a variety of factory ammo. I save the brass and use it to reload. Bitterroot Valley is already using once-fired brass from multiple sources so my reloads are done with very mixed brass of multiple firings. I just don't let it concern me. If the brass looks OK, it gets reloaded. I would guess that the most times I have reloaded any single casing is 3 or 4 and mostly less. I am well aware that I could, if I was concerned enough, weigh brass and also sort for brands. Plus several other things. If I was doing competition all my brass would be new for each match, bought from a carefully selected supplier and run through careful sorting after that. The very worst results were with some Midway Blem 75 gr BT Poly Tip that look like Swift Scirocco's. Varget powder and WSR primers. I think these bullets are too long for my twist. Varget powder has done well in my 308's. Passable results from 69 gr Sierra HPBT MK's over Ramshot TAC with WSR primers. Similar results to the Sierra's using Barnes Match Burners, #22415, 69 gr BTHP Match. Label note: Twist 1:10" or faster. I used Reloder 15 and WSR primers. I will try to post some pics of my last targets to show the groups. No promises.
-
I have two 'Sentinel' cabinets. They fit between 4-drawer files and I drilled holes from inside to inside the various cabinets, put 1/4 inch bolts with washers on both sides and self-locking nuts. The entire group is free standing but tied together with three bolts in each facing wall. Not impossible for a home invader to take apart or carry away but it would take time and be a major hassle. I increased the holding capacity of each cabinet by adding shelves. 1"x 4" shelf boards with a 1"x 2" lip on the outer edge. Fitted like a square horseshoe, supported by corner brackets bolted to the cabinet walls and to the shelving. 4 shelves inside each cabinet. It reduced the space for rifles but allows storage for a lot of ammo and equipment and also handguns. The shelf boards are a 'made' product, I think it is wheat straw & resin or glue. Strong, straight, dimensionally exact and stable, no sag. Not waterproof but water should be a no-problem for this. They have a flat white primer which I left alone. The white color helps visibility considerably inside the cabinets. With the shelves loaded, more ammo stacked on the floor, and the long guns in there, these cabinets are seriously heavy. Adding the shelves to the first cabinet was fun. Experimenting to see if it would work and inventing all the details. The second cabinet a couple of years later was just time-consuming and a pain. Too many brackets; too many small machine screws, nuts & washers; placing finishing nails as assembly pins and clamps for the Gorilla Glued surfaces; making the shelf assemblies even go into place. It felt like I had an electric drill in each hand with a drill bit in one and a screwdriver bit in the other while trying to fit small screws, washers and nuts in place with spare fingers and working a regular screwdriver and a socket wrench all at the same time with other spare fingers. Trying to be on the front inside and around the back to hold screws simultaneously-- creating ways to make it work. But the final result is very useful. Looking at the info in the link you provided, I may buy another cabinet just like yours. All the benefits of what I did to my first two without the work and hassle. And I need more space. Don't we all?