Kilibreaux
-
Posts
216 -
Joined
-
Last visited
Never -
Days Won
2
Everything posted by Kilibreaux
-
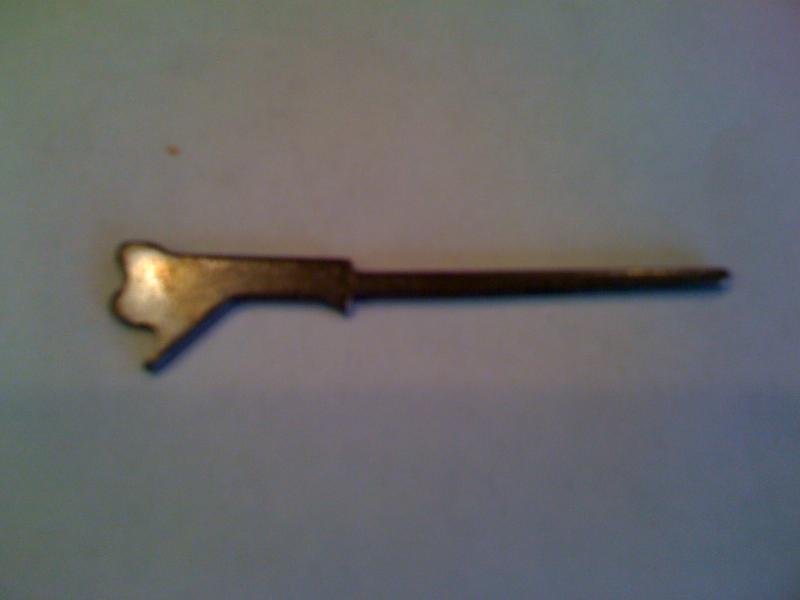
That last picture is too blurry to really see anything valuable. I can see the bolt carrier group is out and a shell is in the chamber but can't make out details. Modding the firing pin spring would have no affect on the bolt hanging open. Speaking of light strikes, notice how thick the firing pin tip is....a bit of CAREFUL stone work on either side can remove a few thousandths and placing a TINY radius on those edges also serves to narrow the firing pin's impact surface making a deeper dent in the case. remember, firing pins are cheap ($5 from ATI) so you can afford to play with re-profiling the nose and if it makes things worse, toss that one, grab a new one and see what works. I've noticed in recent years a lot of firing pins are coming much wider and more blunt than used to be the case.
-
This is a hard one to analyze without visualizing the parts. The Breech Bolt Carrier has the ejector riveted in place and if this has worked loose it could be causing the bolt to hang intermittently. The ejector should be anchored solidly so if there is any detectable play the rivets have failed and need to be replaced. IF you have already done some work on your Firing Pin Safety release lever - as in grinding it down a bit, but not far enough, then what you very likely are experiencing is a hang-up caused by a small ledge on the outside left rear corner of the bolt bumping into the release lever. See, the release lever normally runs right beside the left side of the bolt and presses the Firing Pin Safety button, but outside of this track is a small lug that would normally not cause ANY interference, but if the release lever has been reshaped but still has a portion above the bottom edge of this bolt lug, then it WILL catch the bolt and hold it, or stall it enough to suck the reciprocating energy out. The Firing Pin Release lever needs to be ground down BELOW the level of the bolt ALL THE WAY along it's upper edge if one desires to remove it's potential friction from the equation. So basically you can grind the release lever (plate) all the way down to just a bit higher than the trigger group housing. The bolt hold open is obvious and should be easy to spot. It should release when you draw the cocking handle back with no magazine in place, or with a loaded magazine in place. It certainly could "snag" the bolt just enough to hold it open if something is misaligned or crudded up. The channel in which the bolt hold open spring resides is an ideal receptacle for debris and enough could EASILY get into the space between the Bolt Carrier and receiver interior to induce sluggish action. Also it's possible the spring could have been damaged during reassembly and that portion not visible. If you're using a "wet" oil you might want to consider trying a dry lube which doesn't attract that coarse grit that builds up after firing a couple of magazines. Also, grab a can of WD-40 and reach in there with the little straw and spritz into that spring channel (gun assembled) and see what happens. But....the simplest thing to start with is reach in through the mag well and feel the little tab that is the magazine contact for the bolt hold open and press it up...feel whether it is gritty, or binding, then release it and it should snap downward without delay. If it does anything BUT move with absolute freedom and spring return that's probably where the problem is. OH....if you've removed and reinstalled the bolt's recoil springs backwards - either one or both, THAT could lead to bolt binding as well. Other than the Firing Pin Safety release lever there is nothing in the trigger group that would interfere with the bolt's movement. If none of this puts you on track, start looking at the bolt's recoil guide rods for straightness and tightness. Also check the tightness of the bolt cover - that black "cap" that screws onto the top of the bolt proper (3 torx screws) and basically holds the firing pin and firing pin monster return spring in place. Perhaps that is loose and is snagging something. Check the cocking rod....the chromed rod riding in the upper portion of the receiver. The cocking handle and it's short section of rod push the longer, internal rod back during the action of cocking. This rod indexes against the upper front surface of that bolt "cap" piece I mentioned, and perhaps there is something misaligned there. Again, blown back grit gets everywhere inside the GSG and considering how many zillion shots people tend to run through them in one session a lot of debris can get pushed into some critical tolerance areas. Doing a complete teardown on the GSG between shooting sessions is a PITA and to be avoided as it also increases the likelihood of parts loss, excess parts wear, and potential reassembly issues. The best thing is to remove the plastic parts, pull the trigger housing and bolt carrier group, then get liberal with a spray solvent such as WD-40 - or anything more expensive and purpose built for guns in general or the GSG in particular. Spray solvent can "hose out" all the tiny spaces a lot faster with excellent results. OH...check your bolt...specifically that black "cap" that fits on top....if high pressure vented to the rear and went between that piece and the bolt body it could have caused a deformation or even small fracture that is binding inside. Like I said it's kind of hard to diagnose your problem without seeing your parts, but these are some ideas that come to mind.
-
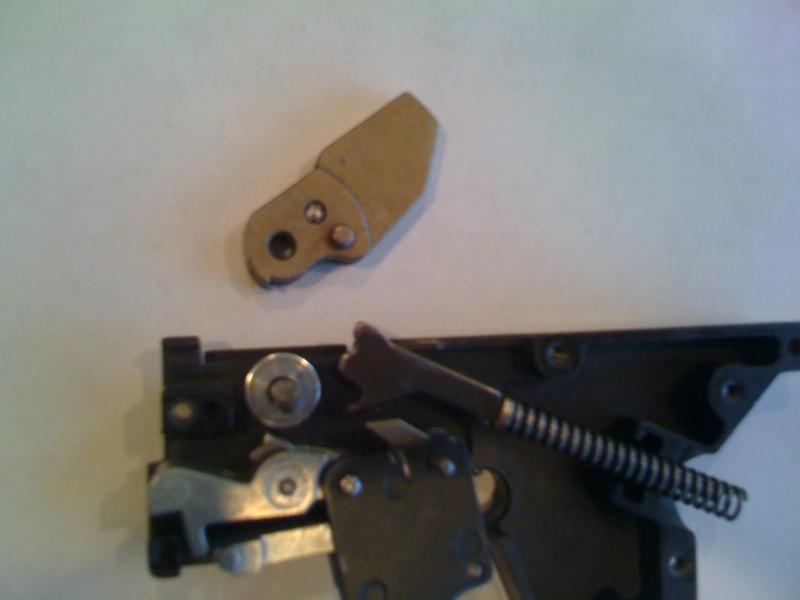
If you look at the GSG-5 exploded view - which I think you can find on this website (if not I can email it to you), you will see the bolt is contained within the "Breech Body" which is the housing that slides out of the rear of the receiver during takedown. Without disassembling the "Breech Bolt Carrier" Parts 91 and 92 of the diagram, one cannot easily visualize the "Firing Pin Safety" (part 95). To disassemble the Breech Bolt Carrier you will need a small Torx driver, I think I bought on at Home Depot for about $7 that has all the needed Torx sizes...they're small. After removing all the torx screws you can insert a finger inside the Breech Bolt Carrier and begin to work the two halves apart. As it separates be alert that one or both recoil springs may fly away, but they're fairly large and easy to see. At this point observe the recoil springs are larger on one end than the other....the big end always goes to the rear when you reassemble. With the Bolt Carrier apart and springs out you can slide the bolt back and lift it out. Looking at the LEFT side you will see a large ball-shape...this is the Firing Pin Safety and is comprised of the cylindrical pin and a spring. To remove it you will first need to use your tiny Torx driver to remove the firing pin Retainer Set Screw (part 96) which then allows you to let the Firing Pin Retainer Pin (part 10) drop free (you will have to press in on the firing pin to relieve pressure on it). After that the firing pin will eject from the rear under the force of the Firing Pin Spring (part 101) - this is the monster spring I've mentioned before. As the firing pin comes out the firing pin safety will pop free under spring pressure, and yes it will also fly somewhere if you're not looking. If you choose to leave it out you leave out nothing that the gun will miss, and nothing that will make the gun one iota less "safe" than it was before. That firing pin "return" spring is more than ample to prevent any possible thought of a slam fire. Also, the firing pin safety is released when the trigger is pulled and one might presume it's point of function is to prevent firing if the hammer were to accidentally jump off the cocked notch....except when the trigger is NOT pulled the trigger bar interposes itself under the sear housing (arm) so that it cannot physically move out from engagement with the hammer notch. Basically the only way the hammer can "jump the notch" is some form of catastrophic parts disintegration - yeah, could happen, but not as statistically probable as being hit by a meteorite, and that's pretty rare. Now, when one PULLS the trigger, the presumption must shift toward the notion they intend that the gun fire in which case not having the firing pin safety is of no consequence. During cycling, since the trigger is held back the "Firing Pin Safety Lever" (part 49), otherwise known as "that giant plate" is also held fully forward and holds the firing pin safety in a depressed orientation throughout bolt cycling. Now, that giant plate...part 49 on the diagram. It serves the function of releasing the firing pin safety as well as trigger return, oh and the function of "confusion" of precisely WHAT it does to thwart would-be you know whaters. Because the firing pin safety rides along the face of this plate during operation it must of necessity apply drag to the bolt. Also the bolt body proper may, can, might make contact with the plate during operation and this adds more drag. Drag is drag however small and in the .22LR every little bit hurts. I noticed on my bolt clear signs of the plate rubbing. Basically the "cure" is to grab your trusty dremel and pair down the upper portion of the plate, taking it down to a point where its top edge lies below the bolt. This is not hard, takes only a few minutes using a cut-off wheel, and does not even require disassembling the trigger group. The part that is left still provides trigger return. Unfortunately it's not so easy to toss that waste of time magazine safety located on the other side of the trigger group. For that one...well, the SPRING will probably depart all by itself when you first slide the trigger unit out of the plastic lower housing, but then, to remove the actual "Magazine Safety" (part 45) you will need to crack the trigger housing. Does it "hurt" to keep it...no.....but it means the magazine or a finger must be in place to depress it in order to fire. In the unlikely chance you're in the middle of a tactical reload and a rabid squirrel rushes you because he heard your mag plop to the ground, you have that one round in the chamber you CAN snap off...might be small, but hey, it's a round you HAVE ready to fire versus being locked out. Also if the mag were lost one could manually insert rounds and fire them normally without having to perform additional complex manipulations to reach inside the mag well and press the mag safety lever during firing. These are really simple mods....the hammer strut mod is more complicated to be sure and re-cutting the sear to hammer notch angle is a job best reserved for an expert, but it WILL make the gun more "solid" and less dependent on a relatively weak spring to prevent doubles and triples. BTW, look at the photos posted by Popcop in the this thread and you will see in the photograph of his lower unit the firing pin release lever (that giant plate) sticking up beside the hammer.
-
Well, the GSG, like many firearms has strengths and weaknesses. For example, the 10/22 is functionally reliable out of the box, yet with aftermarket mags not so good. The GSG on the other hand, has out of the box issues, but has a VERY reliable magazine system. I've never had any reservation about grabbing a dremel or a file and going to work on a firearm. I have over 35 years of competition shooting, modification, and outright fabrication of major and minor firearms components. The GSG is a GREAT foundation that only needs a bit of tweaking here and there to make it part of a serious survival arsenal.
-
It does but not consistently. As I said, the extractor is pushed out, away from the rim by the beveled extractor slot in the barrel. This means that when you work the action the extractor must move inward by spring pressure to snag the cartridge and even then, the extractor hook has minimal purchase on the spot where the cartridge rim and case meet. Something I didn't mention previously is the extractor could have it's outside surface trimmed down so it settles as deeply as possible in the extractor slot during action operation. Remember, during actual firing the cartridge is being shoved out of the chamber and the GSG does extract quite well - at least mine does.
-
With your hammer strut modified, and the trigger unit out of the gun, the hammer will in fact rotate far enough forward to contact the forward edge of the trigger housing. However, ASSEMBLED the hammer is prevented from rotating more forward than "vertical" because the bolt is in place. This relates to an earlier comment I made that you could in fact grind the hammer pin notch on the strut completely away and have no functional problems at all because when assembled the hammer is prevented from "over rotating" by the bolt. When disassembled however the hammer - if not cocked and held back by the sear would be free to rotate forward until contact with the trigger housing stops it. If you examine the workings of a 10/22 you'll see that it's hammer strut has no hammer pin notch and when disassembled and the hammer released from the sear, it will rotate far enough forward to allow you to remove the hammer strut and spring. As for your ejection problem, we come back to how blowback .22's work. With a .22 the extractor really provides "secondary" extraction. Primary extraction is when the gun fires and breech force shoves the bolt open...the shell is kicking itself out in point of fact. Take a look at a Beretta M0d 21 and note it has no extractor. The company touts the fact that it has a tip-up barrel as making it easy to load the chamber, but in fact this feature is really there to allow an unfired round to be removed from the chamber because there is no extractor to drag it out. The gun extracts purely due to breech face thrust. Well...so to do ALL .22's. This is why when you fire live rounds the GSG "extracts" and ejects perfectly, yet when manually cycling the action you'll often end up with the shell still in the chamber. Whether the bolt is allowed to slam forward or is "eased closed" will make a bit of difference. If you look closely you will see that when the bolt is closed the extractor is cammed outward by the angle of the extractor slot on the barrel. As the bolt opens the extractor - which has a sharp "hook" tip is spring loaded to move back inward and snag the rim of the cartridge, but here's the thing...when firing the shell itself has already pushed the bolt open so the extractor has ample time to engage the rim and add whatever "secondary" extraction is needed - mainly to anchor the outside of the rim to ensure/enhance ejection when the other side of the rim hits the ejector. On the other hand, when "slow cycling" (because no human can rack the action anywhere near as fast as the gun does when firing), the extractor can slip off the rounded rim. There are a couple of ways to approach this...you can go through the hassle of removing your extractor and carefully working the tip into a sharp(er) hook to better snag the soft brass case rim, or you can grab a miniature square file and carefully "hone" the extractor notch in the barrel to remove a few thousandths and improve extractor engagement. Oh, you could also experiement with a stronger extractor spring. Extraction of a fired case is generally more "sure" because the entire rim tends to flatten slightly creating better purchase.
-
OH...your photo #2 shows the sear in the rebound notch...that's the one you grind away. The cocked notch is the one behind that and of course you need to keep that one. Sorry if I am stating the obvious but I just wanted to cover that base.
-
Looks like you did an excellent job! I think your notch is pretty close in depth to mine. If you look at your photo set - picture #2 you'll see the problem. You removed the rebound spring, but the rebound notch on the hammer is still there so of course the sear is snapping into it. Now, when you actually drop the hammer from full cock by pulling the trigger the hammer will not land on the rebound notch...so as is your mod works. IF you retract the bolt far enough to insert the chamber level - that little plastic piece designed to prevent the firing pin from hitting the breech block when dry-firing, you are pushing the hammer back far enough to get caught by the sear. For this reason you have two ways to "test" your mod. Way one, cock the weapon and let the bolt run forward. Hold it open about 1/8" back from fully closed and pull the trigger. The hammer will fall but the bolt being slightly open means the firing pin won't strike the breech block. Then RELEASE the bolt to close. Now gently start to tug back on the cocking handle and you will feel the hammer's spring force right there or just slightly back. Way two would be to insert a fired case in the chamber, cock the weapon and pull the trigger letting the firing pin hit the case rim. Then retract and note how the added pressure of the hammer/spring is right there when you start to cock the weapon. A small amount of "play" isn't bad...remember before you did the mod you had about 1/4"of "slop" but now you may have just a few thousandths and that's a major improvement. IF however you want the hammer right there, deepen the cut out in your strut a bit more....but take note that once you can no longer see excess metal when you rotate the strut in the hammer, you're done. The way to NEVER worry about that rebound notch on the hammer again is grind it off and contour the hammer...look at my photos and you'll see my hammer has no rebound notch. You did a good job!
-
Okay I finally got some photos with my iPhone, but I think the blurriness comes from a smudge on the lens. Anyway I think one can see how the hammer strut has been deepened considerably. Sorry, I didn't take a before shot.

-
No, the hammer strut modification has nothing to do with the bolt group. Those two long springs inside the "breech bolt carrier" (bolt housing) are the recoil springs and must not be removed. In order to function safely the GSG and any blowback .22 must have spring pressure to hold the bolt shut during cartridge ignition and high chamber pressure. When the cartridge fires pressure inside the case builds rapidly and thrusts the bullet out and down the barrel. At the exact same time breech face thrust pushes the opposite direction. The bullet weighs very little. The bolt and hammer weigh many times more, plus they have the closing force of two powerful recoil springs and (in a proper blowback system) the power of the hammer spring to counteract the pushing force exerted by the cartridge case against the bolt face. Because of the difference in mass and applied force between the bullet and operating components the bullet APPEARS to leave the barrel before the bolt opens, but what precisely happens is the bolt starts moving as the bullet starts moving, only, the bolt moves very much slower thus keeping the case in the chamber long enough for the bullet to exit the muzzle and chamber pressure to drop before the bolt has moved sufficiently to allow any meaningful escape of gas around the case and to the rear. IF the bolt starts moving too soon during the pressure phase of firing, the case separates from the chamber wall and begins moving out thus creating an opening for high pressure gas to vent rearward. If the bolt moves too far while pressure is high, venting gases will have enough force to damage components. In the case of the GSG the extractor slot on the right side of the chamber is a weak spot and of course high pressure will always blow out at the weakest spot. Another spot that "channels" high pressure gas if present is the extractor slot in the bolt which lies under the "breech bolt cover". When gas vents into this space it can lead to a crack in the cover. If the barrel is too short for the mass and applied force of the operating components the opposite will occur. The bullet will speed away, chamber pressure abruptly drops and insufficient remaining force causes the bolt to open slower, fail to move back far enough, and leads to extraction issues and feed jams. Blowback .22's differ from locked breech designs in that a locked breech means the breech face and chamber remain fully locked together until high pressure has dropped. In a recoil operated system this means the breech and barrel bolt remain together as the entire system "recoils" and in a gas system the breech remains locked to the barrel until the bullet passes a small opening, or gas port near the muzzle that allows gas to operate an unlocking mechanism. Locked breech systems are used when pressures being contained are higher, and because blowback systems start to become quite heavy and unwieldy when cartridge power gets beyond the mid-level pistol cartridges. Note that blowback systems allow the bolt to SEPARATE from the chamber immediately upon firing and being moving in the opposite direction, and so it become critical that the bolt not be allowed to move to far to soon or parts damage and case rupture can occur. Some might erroneously presume that the designers of the GSG knew what they were doing and the original design of the GSG is satisfactory for sustained operation without concern. This is not the case. The GSG actually uses fairly heavy reciprocating components and quite powerful recoil springs and hammer spring. The result is the weapon demands the use of high powered loads in order to operate and this is in direct opposition to the presence of a rebounding hammer. The hammer loses all forward spring force during the last 10 degrees of rotation (give or take) continues under inertia, hits the firing pin and "rebounds." To aid this function, a tiny "torsion" spring is located inside the left trigger housing with an arm that pushes against a small boss on the left side of the hammer - pushes it BACK. The hammer also has a secondary notch design so that once "rebounded" the sear will snap up and lock the hammer in this retracted position. Sounds wonderful...but in practice it violates the fundamental requirement of a blowback system. The hammer's mass and spring force now resides about 1/4" behind the bolt. During high pressure the ONLY things resisting bolt opening are the recoil springs and bolt mass and at full extension the recoil springs exert very little force. As anyone familiar with hammer-fired .22's knows, the hammer's mass, the hammer's spring force, and the hammer's LEVERAGE contribute anywhere from 1/3rd to 1/2 of the "bolt closing force." For example: Drop the hammer on a 10/22 and then retract the bolt. The hammer's presence is right there from "0" to resist opening. Drop the hammer on a P22...same thing, the hammer's spring force is right there, right AGAINST the back of the slide...there is no "slack" or "slop zone" created by the hammer rebounding. The GSG violates this "rule" by removing 1/3 of the bolt closing force creating an imbalance in chamber pressure versus what is available to hold the breech shut...or more precisely stated DELAY the breech's opening until pressure has diminished. Thus, the first 1/4" of travel the GSG bolt is amazingly "under supported" and routinely skirts the safe zone of operation. Does it work? Sure. Does every gun experience a high pressure venting - YES, but most of the time that venting is insufficient to cause damage. Do a search on Ruger 10/22 chamber blow outs...you'll find none. Do a search on Walther P22 chamber blow outs...you'll find none. Do a search on GSG chamber blow outs...you'll find some, and those are just the one's who share their experience. I would like to point out that the GSG is loaded with operating features that provide not one WHIT toward reliability or safety, yet are present purely for limitation of liability...and they can all be removed with no decrease in function, but an INCREASE in reliability. Bear in mind, "what you leave out can't break..." an unfortunately ignored rule in the world of modern firearms design. The magazine disconnect...don't need it, and no combat expert would want it. Remove and you'll never notice. The firing pin block...totally POINTLESS and in fact only semi-functioning. The firing pin is locked only until trigger pull, then remains fully unlocked at all times until trigger release, which means were it not for the monster firing pin rebound spring and featherweight hammer the GSG MIGHT slamfire once every blue moon. It adds parts not needed and if removed not missed. In FACT the GSG will function perfectly fine with NO firing pin return spring and will never slamfire...I know, I tested it, and for anyone experiencing light hits the first thing to consider is yanking that spring made to lift a house and replace it with a much lighter one or none at all....and guess what....failures to fire are gone. The hammer rebound spring....toss it. Hammer rebound notch....grind it off because it can ONLY serve to snag the hammer enough to cause a light hammer blow depending on sear arm movement....a person with a LIGHT trigger finger can in fact induce a hammer snag leading to failure to detonate. Hammer strut...must be reshaped to counter the rebound feature...and in fact does not "need" the hammer pin notch at all save that the strut is intentionally a bit too short to completely remove it and ensure the hammer strut moves smoothly with the trigger group when out of the gun and hammer not cocked. If the person assembling the gun understands the parts the hammer strut could do without the hammer pin notch completely and function 100% while ensuring the bolt stays closed as it should during high pressure. That giant firing pin release plate on the left side....once the firing pin lock is tossed out it not only isn't needed but it creates drag on the bolt...grind it down and keep only the bottom portion that operates the trigger return. The firing pin release plate and it's location CAN serve a function but that function cannot be discussed here. Sorry I kind of went on a rant, but I get a bit worked up over the way the GSG could have been GREAT right out of the box, and CAN be GREAT with the right work invested. Anyway, no, do NOT remove your recoil springs. The hammer strut is located in the trigger housing...but unless you are VERY familiar with how this goes together and how the parts operate I would not advise going in there and going to work with a dremel. For those interested I suppose I could offer to do the strut mod, but to do so I would probably want the entire trigger group in hand to insure the mod is right and installation is right.
-
I've got about 500 rounds AFTER the mod and of course everything is working perfectly - better than stock. The mod eliminates the fear of chamber/bolt damage from early release of pressure. After the mod the hammer does sit vertical behind the bolt. Remember the bolt rebound spring is removed. Also I ground the rebound notch off the hammer as well....don't need it with no rebounding hammer. I agree with looking for ways to smooth out everything possible in the action.
-
I should post a photo showing the strut after modification, but I just haven't had time to get around to it. The mod is actually quite easy and self-guiding...yep, self-guiding. You remove the hammer and the strut. You will note the hammer strut has two rounded depressions, one to index against a pin in the hammer to drive it forward and the other indexes to the hammer pivot pin. Both are about the same depth. During operation, as the hammer is cocked by action of retracting the bolt the pin inside the hammer bears against the upper notch of the strut. When the trigger is pulled the hammer flies forward and during the last approximately 10 degrees of rotation the lower strut notch makes contact with the hammer pivot pin thus STOPPING the strut's further movement. The hammer continues under inertia to hit the firing pin and then "bounces" back as well as being helped to retract by a small coil spring located on the left side of the hammer that acts to aid it in "rebounding." Other than the hammer's striking inertia there is no direct pressure applied by the hammer spring during cartridge ignition. Taking note of how other blowback .22's work, a significant portion of resistance to chamber opening is provided by the hammer and hammer spring, and the lack of it with the GSG has led to many accounts of chamber failure and cracked bolt housings...and every photo I've seen shows clearly the damaged areas are the "weak points" such as the extractor slot in the barrel and extractor slot in bolt which channels high pressure gas into the space between the bolt proper and the bolt shroud. Also, rim failures are increased by the bolt opening too early.... Anyway, take the hammer, leave the hammer pivot pin out, insert the hammer strut so it's upper notch or depression indexes against the pin inside the hammer, then ROTATE the strut downward relative to the hammer and view where the lower strut depression appears through the hammer pivot pin hole. You can also lay out the two pieces in the trigger shell and see the orientation with the hammer strut mounted along its line. Basically, use a fine tip Sharpie to mark the strut then use a dremel to cut the notch deeper. A cutting wheel deepens the notch quickly then shift to a diamond burr for fine and finishing work. You know you're done with you connect the strut to the hammer and rotate the hammer forward and no longer see metal through the hammer pivot pin hole. The strut is long enough so that even after deepening the pivot pin notch it still has enough extension to pass through the brass bushing that fits behind the spring and locks it into the trigger housing. One can EASILY tell the difference between a modded strut and stock. On a stock GSG with the hammer down, the bolt can be retracted approximately 1/4" before hammer spring resistance is met. After being modded the bolt will start out with the hammer spring force applied. I know, I should just post a picture but that means taking it all apart....
-
The hammer strut mod was purely about cutting the notch that indexes against the hammer rotation pin to allow the strut to move further forward under full spring pressure. This places the hammer with spring force right up against the back of the bolt during cartridge ignition and high pressure phase. As for a firing pin disconnect, yes the GSG does in fact have one - actually a firing pin lock. The problem is that when the trigger is pulled and held to the rear an entire "plate" moves forward to unlock the firing pin. During bolt recoil the firing pin is fully unlocked all the way back and all the way forward. Do not despair however...the firing pin return spring is strong enough to lift a house off its foundation so the potential for an inertia hit by the firing pin is somewhere between nil and impossible. Even a jam on loading will not induce the firing pin to drive forward under inertia because of the monster return spring. To clarify, when the GSG trigger is NOT pulled, the firing pin is in fact LOCKED. When the GSG trigger is pulled, the firing pin unlocks and remains unlocked as long as the trigger is held to the rear. The hammer strut mod is all about putting maximum force right up behind the bolt during the high pressure phase of cartridge ignition. Cracked bolt housings and blown chambers are the DIRECT result of early bolt opening due to a rebounding hammer system designed purely for liability and prevention of "easy" full auto conversion and has NOTHING to do with anything beyond that. Modding the hammer strut should be a "mandatory modification" because it eliminates the bolt pushing back half a case length during high pressure.
-
Yes I do.
-
Thanks for the feedback. I'm a bit confused because I've spent considerable sums stocking up on high performance jacketed ammo to feed my GSG and P22, yet the soon to arrive Razorback is built to use the "cheap stuff" per se. I've found Blazer in 50 round boxes online for $1.69 or $16.90/500 which is cheaper than Blazer bulk pack, and roughly half the price of Aguila Supermax.
-
Anybody have experience with CCI Blazer 40 grain LRN? This is what Lakeside Machine builds their Razorbacks to shoot and they swear by it, so I am curious as to how non-belt-feds handle it.
-
Will a UTG AR15 carry handle fit on my GSG-5?
Kilibreaux replied to louielouie's topic in GSG-522, GSG-5 General
Yeah, I kinda have to endorse that sentiment. -
Personally, I would enjoy having a .22LR chamber in an 11.5" barrel configuration, but of course that is not allowed to we mere mortals. The 11.5" barrel "M16A3" with sights is seriously the hot ticket, and to have one in .22LR would be super fine!
-
I think the M4 is simply a "cool looking" profile versus the standard M16. The thick barrel with slot for mounting a grenade launcher has an appeal, plus the shorter barrel. Of course the real M4 barrel is 1.5" shorter than commerical issue, but the "look" it there, and it appeals.
-
I have to say, I've been nothing less than impressed with my P22. But I seem to remember something about the early release models having various issues, not the least of which were defective magazines? Mine has functioned 100%...and I'm not even trying to exaggerate. Cleaning has been easy...I am always surprised at how clean the action is after shooting. When I first got the P22 I thought I needed to baby it due to it's construction but nothing like that has been the case. I should mention my Ciener Platinum Cup .22LR conversion unit the the 1911 uses an all aluminum slide (granted anodized aluminum has a higher surface hardness than steel), and the P22 uses a full, steel insert within the slide where all the hammering and bashing goes on. One thing I DID modify was the hammer's top edge before I ever fired it...I filed and stoned it down until the retracting slide barely presses on it and that very much smoothed up the gun's operation. As purchased the hammer placed considerable upward pressure on the slide during cocking and perhaps that has much to do with why my pistol has never FTF, or FTE. Once that hammer is cocked the slide uses little additional energy in reciprocation.
-
bdavison: You're right....it looks like either a massive casting line or join line and the recess in the front portion of the trigger guard gives away the fact that a screw is there.
-
Okay...I have to ask...what is a "zamak" firearm?
-
The question of whether the .22LR is "better" than larger caliber centerfire rounds is somewhat moot. The .22LR will kill, and it will incapacitate. Should someone opt to leave their 12 gauge in the closet and select their .22LR for home defense? I have not said that and do not advocate such. All I have said is the .22LR is a lethal round capable of inflicting mortal injury and should NOT be viewed as inconsequential in the spectrum of choices related to choices. A .22LR will punch to the vitals...a .22LR will "do someone" quite efficiently. Anything that suggests otherwise is pure hogwash and bullshit. Humans by their nature must justify the choices they make regardless of reality, and despite empiric evidence to the contrary. A LONG time ago during the age of swords we discovered a through and through puncture was superior to a slashing cut by a sword. The same holds true with the ballistics of small caliber rounds. We think we need more "power" yet the brutal fact is small, penetrating wounds do a masterful job of putting a relatively large human down. While it would seem preposterous to advise anyone to carry a .22LR for self-defense, the tiny round delivers far beyond what its paper ballistics suggest.
-
I'll tell you about a couple of "neat upgrades" you might not have thought about. The first is to fit your 10/22 into an M1 Carbine stock...looks WAY cooler than stock and functions the same. Combine that with aftermarket reap aperture sights and you have a very interesting yet fully functional rifle. http://www.eabco.com/m1_carbine_ruger_1022_tribute.htm The second is to consider fitting the entire 10/22 action into an Airsoft based P90 stock, or even a Steyr AUG version. The 10/22's modular design lends itself to being lifted from "stock" and carried over to any "tactical" design one might want that the "gun unit" will fit inside. Check out YouTube for videos of 10/22's fitted into Airsoft stock housings. A year ago I bought a $34 Airsoft P90 stock, ripped out the guts, added ABS internal reinforcement plus a billet aluminum "upper" to house the 10/22 and created an amazing little bullpup that is not only a blast to shoot, but has "tactical" written all over it. Having done that I have concluded that while the 10/22 CAN work for a bullpup design it works BEST in a conventional stock layout where the magazine is ahead of the trigger unit, and the M1 Carbine is an ideal "profile" to choose.
-
The old Eagle brand "Alpha" mags have proved 100% reliable even for full auto use, but the problem is that like so many they are polycarbonate and destined to crack. I have some that are close to 20 years old and still going strong, though I have noticed some small hairline cracks. The Eagle mags are single-stack and have an outrageously exaggerated curvature, but they work.